Could You Take My Picture? (Or Three? Or Five?) ‘Cause I Won’t Remember.
This week I made my first HDR photographs! What is HDR, you ask? Well, it stands for High Dynamic Range. Basically, where the human eye can make out differences in brighter and darker lighting at the same time, a camera is unable to capture those same nuances in a single exposure. An HDR photograph bridges this gap by compiling a single image from multiple exposures of the same view. To get as much lighting detail as possible, the pictures range from underexposed to overexposed. The end-result is a highly-detailed photograph that, in comparison, could be considered hi-def. At the very least, the picture is incredibly cool!
Now, I need to amend my first sentence. While I created my first few HDR images this week, the pictures I used for them were actually photographed a few years ago. What can I say? I leave projects unfinished all the time. In any case, I first found out about HDR photography back in the summer of 2008, from a desktop wallpaper art website called InterfaceLIFT. I was stunned by the clarity and surreal look of some of the pictures and had no idea what “HDR” meant, so I quickly did some research. Armed with a basic understanding, I immediately set out to try to duplicate the process with my pathetic digital camera. I only got half-way through, though, since I did not have the necessary software to complete the task, and so it wasn’t long before I forgot about the whole thing (read: “gave up”).
Flash forward to a few days ago. I got into a discussion with someone on twitter regarding an HDR app that a programmer was working on. The discussion quickly led to my checking out another person’s HDR photographs taken with the same camera phone as mine. The pictures were beautiful. Naturally, I wanted capture my own shots like them. Thus, I finally decided to finish my years-old project.
It turns out that compiling an HDR image isn’t so difficult—you just need the right software. While there are quite a few programs that can do the compiling and subsequent tweaking, the most important one is Photomatix Pro. Armed with the very detailed, yet simply-followed tutorial by Trey Ratcliff, I was shocked at how easy it was to make the HDR. When I finished, I thought these exact words: Why didn’t I do this sooner?! Incidentally, Trey Ratcliff’s website, Stuck In Customs, has some of the most beautiful and stunning photography you will ever see. After viewing his gallery, all you will want to do is grab a camera and take pictures for the rest of your life. Anyway, enough yapping and on to the pictures!
Essentially, the best way to capture the necessary shots for an HDR photograph, is to attach your camera to a tripod and set it to burst mode, with each image having an greater amount of light exposure than the last. My camera didn’t have a burst mode, so all I had going for me was that I had a tripod. Thus, I painstakingly took multiple shots of the same subject with different settings. I’ll be honest with you: I never had high hopes for the series. I just wanted to try to do it. Boy was I surprised!
Here are the images I used. (Click on the images for a larger view.)
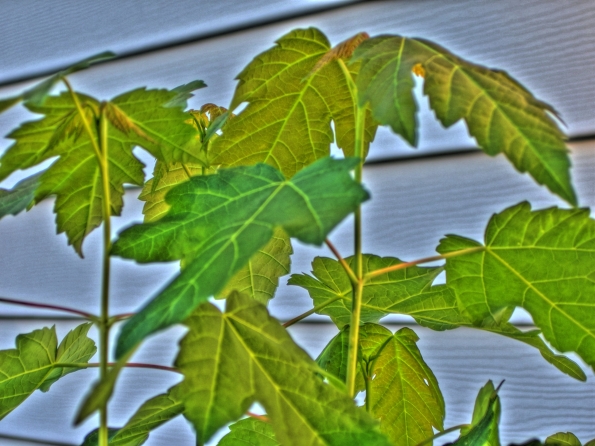
And here is the resulting HDR.
Not bad, eh? Of course, as can be seen in my next pictures, the software can make almost anything look good.
About half a year after I took the pictures of that plant (a potted maple seedling, by the way, which I have since planted in front of my house), I was at a wedding in New York. The wedding took place at the Marina del Rey, which is located between the Whitestone and Throgs Neck bridges. My camera was unable to take decent nighttime pictures of the bridges, so I decided to take some time-lapsed exposures in the hopes that I might get something. Since I didn’t have a tripod with me, I set the camera on top of a low wall. The wall was not level, thus the angularity of the shots.
Here are the pictures I used of the Throgs Neck Bridge.
And here are two different HDRs I created by using different settings.
As you can see, a couple of tweaks to the settings can yield very different images.
Finally, here are the pictures I used of the Whitestone Bridge.
And here is the resulting HDR.
I think I like this last one the best. I’m not sure why, but I guess it’s probably because it looks the most real. Which is strange, really, since the whole “hyper-real” aspect of HDR images is what drew me to the form in the first place!
Well, I hope you like my humble (very much so) photographs. Perhaps I have even inspired you to try to make your own. If you do, however, do yourself a favor and don’t take three-and-a-half years!


